Creating Auto Follow Ups in TigerLRM
- Posted on
- in Tips and Tricks
- by Hailey Dziubinski
So what exactly are “Auto Follow Ups” (AFU’s)??
Auto Follow-Ups allow you to pre-schedule a series of emails and text messages to go out to a lead or contact in the LRM....blah blah blah.

Basically, it's a time saver.
Have you ever had so many follow ups to do that you started looking into human cloning? Well, this is a much more cost effective and less complex option.
Oh and did we mention that you can set up task reminders to call the lead or contact within the AFU sequence as well? Because you can LITERALLY do that too.

Additionally, you’re able to create and save templates to use. Not to mention, (don't mind if I do) you’re also able to send your AFU to multiple leads and contacts in one fail swoop.
The idea was to eliminate the need to rely on notes or other outdated/archaic methods to remember to do your follow ups. Instead, the process is automated.
Below you’ll find the steps on how to use this magical tool.
WARNING: The following tutorial contains life-changing information that may lead to more effective hunting and closing, read at your own risk!
Creating an Auto Follow-Up:
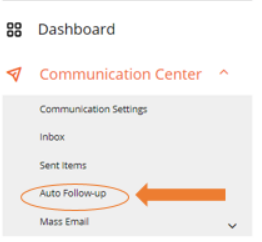
1. Begin by logging into your TigerLRM account and selecting the
Communication Center  module to the left of the dashboard. From the dropdown
menu, select Auto Follow-Up.
module to the left of the dashboard. From the dropdown
menu, select Auto Follow-Up.
2. Select the clients time zone (if it’s different from yours), as well as the lead(s) or contact(s) you would like to follow-up with.

3. Select a template if you have one available for the auto follow-up, if not select the Activity Type option to begin formatting your Auto Follow-Up.
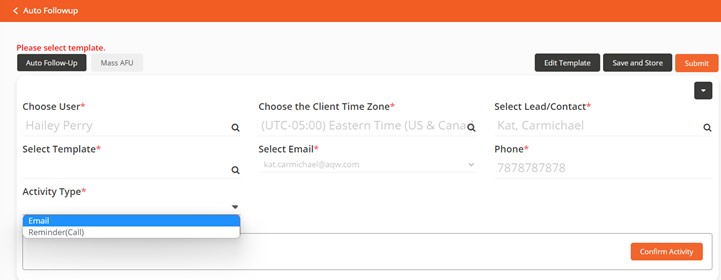
4. Once you have selected the Activity Type, begin creating your Auto Follow-Up. Be sure to include a Schedule Date & Time and Subject as these fields are required. You may choose to add an importance level (high or low) or attach a file but these selections are not required.

Note: When creating an Auto Follow-Up, you will have the option Select Field which will populate shortcuts to the Copy Merge Field value. You can copy and paste this shortcut directly into your Auto Follow-Up. Once the follow-up is sent, the information will populate to match that of the fields selected. Example- {FirstName} would transpose into the First Name of the Lead/Contact once the follow-up is sent. Therefore, you should ensure that the Lead or Contact names are correctly entered in the LRM as they will appear in the message as they are entered in the LRM.
5. Once all necessary information has been added to the Auto Follow-Up, select the Confirm Activity button at the bottom of your screen to save your Auto Follow-Up. This will enable a pop-up for you to confirm that you would like to schedule the AFU, Select Yes to continue. By clicking yes, you are simply confirming the activity is exactly as you want it to be. After confirming, you will not be able to go back and edit the activity. So, before hitting confirm ensure that everything is correct. Then you can continue adding additional follow ups. Be sure to confirm activity after each.

6. Finally, select the Submit Button in the top right-corner of your screen to schedule the Auto Follow-Up. The follow up will begin according to the time and date you scheduled for your first email or text message activity. You can definitely set up a follow up to go out immediately—just check the current time and schedule it to be sent at that time. Automatic and Easy.

To Save a Template for Future Auto Follow-Ups:
Once you have begun the process of creating an email or reminder message for an Auto Follow- Up, you may want to save it as a template to use in the future. Saving Templates is easy and can be done before you schedule the Auto Follow-Up.
1. Once you have created an Auto Follow-Up that you wish to also save as a template, select the Save and Store Button.

2. After making this selection, you will be prompted to create a name for the template and select Save.

Once you have successfully saved your follow-up template, you will be able to select it as a template option when creating Auto Follow-Ups in the future.
How to assign a user to become a sales enablement professional in your TigerLRM Dashboard.
To assign a sales enablement user, simply go to Administrator > User Management > Edit User.
Once you are on the user's information, you can select if you want them to be "Non-Admin," "Admin," or part of the "Enablement Team." Save this information, and your desired user will have the right access.
You can access your Dashboard here.